
How to Make a Cat-o-Lantern

Disclosure: I may receive commission for items purchased through links. This helps keep our site free to readers.
Adorbs! Make your own fun, spooky and frisky cat-o-lantern with this easy tutorial. Ready to get “familiar” with the technique? Let’s get started!
Supplies
- Two pumpkins: a large one for the head and smaller one for the body
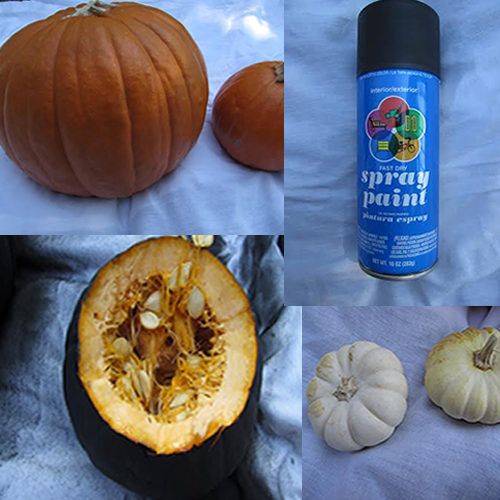
- Two mini-pumpkins (Jack Be Littles or Baby Boos) – pick a size that will be suitable as paws for your cat-o-lantern
- A zucchini or cucumber for the tail
- Black spray paint (flat, satin or gloss, per your preference)
- A large knife
- A fine cutting tool
- One tea light candle
- Black cardboard or posterboard
- Pins
- Paper
- Scissors
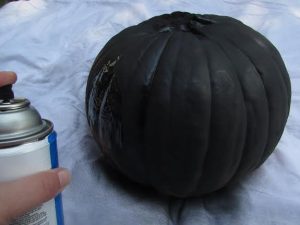
Step One: Paint
- In a well ventilated area (outdoors is best), with your mouth and nose covered with a mask, spray paint all four pumpkins/gourds and the zucchini (or cucumber).
- Allow to dry and then turn each vegetable over and spray the bottom to make sure it is completely covered. Allow again to dry.
Step Two: Carve

- Cut out the TOP of the smaller pumpkin as you would to carve any pumpkin. This will be the BOTTOM of the cat’s head. Scoop out insides and scrape.
- Draw an eye shape onto your blank paper and cut it out to make a pattern.
- Using pins, create pin marks all around the eye shape as shown. This will be your cutting guide. Flip the eye shape cutout and do
 the same for the second eye.
 - Cut the eyes out using the pin marks as your guide. Re-scrape the inside if any pumpkin bits are hanging into the eyes and visible.
Step Three: Add Ears
- Touch up the outside of the head with spray paint if necessary. Allow to dry.
- Cut an ear shape out of your black posterboard, leaving a small square tab at the bottom. Use this cutout as a pattern to cut the other ear. Fold down the tab at the bottom of each ear and pin to the head.
Step Four: Arrange Body Parts and Display
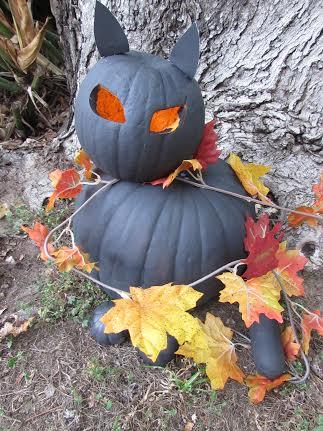
- Arrange the body, paw (mini pumpkins) and tail (zucchini) pieces the way you wish them to look.
- Place the tea light on top of the body. Light the wick.
- Arrange the head on top of the body, over the light, so that the eyes are glowing. (We placed the head off-center here so that Kitty is looking over her shoulder.)
TIPS:
- To get a faux glow in the daytime, place an orange or yellow piece of paper behind the eyes. At nighttime, remove the paper and light the candle.
- For a squatter, rounder cat, choose a round pumpkin body; for a leaner cat, choose a taller pumpkin body.
- Touch-ups are easy to do; just squirt a quick spray of spray-paint.
- Use gloss paint if preferred. The tutorial shown here was created using flat black spray paint.
- Larger eyes are spookier. Experiment with ideas on a piece of paper before creating your patterns and carving.
- Two or more cats make a great look. Use different pumpkin shapes for the bodies in order to get a varied and interesting look.
- To avoid candle wax dripping onto the body, place the candle in a small, flat dish that fits under the head.
- If the head won’t stay on top of the body or is wobbly, carefully break some wooden chop sticks or use thick toothpicks. Push the picks into the bottom of the head and push the head down onto the body. An alternative is to arrange your cat so its head rests against an outdoor wall, or use clay to attach the head to the body.
