Image credit: instructables.com
Looking for a great new Halloween prop that hasn’t been done to death? Don’t lose your head – make this creepy decoration! Making a Head in a Jar prop is so easy, it’s almost scary – and the project won’t bust your Halloween budget. Read on to find out how to create this creepy Halloween decoration.
What You’ll Need
Make sure you have all of your materials ready before starting your project. Here’s what you will need to assemble your Head in a Jar:
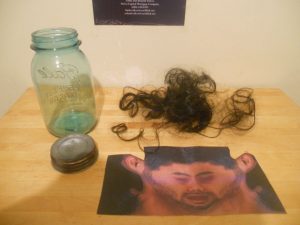
- a printed color image of a spread-out face; look here and here for examples
- a jar that your head printout will just fit into when the paper is rolled up (tinted or aged/imperfect glass is preferable, or anything with a cloudy appearance)
- scissors
- school glue
- small amount of wig hair, if desired
Assembling Your Severed Head
 (I just had to make the title gory!)
The first and one of the most important steps in this project is to locate a jar to hold your “head.” For a spookier effect, choose colored glass; otherwise, a standard Mason jar (you know….for preserves…even human ones, apparently!) will do.
Now find a great face image by Googling the words “3D face texture map.” The face should be realistic; a Photoshopped image of a real person’s mug is ideal. A tortured appearance adds to the effect, so look for squinty eyes, puffiness, an open mouth or other evidence that the donor was less than willing.
Print out the image you’ve chosen and make sure it fits your jar once it’s rolled up and inserted. Enlarge or reduce the size if necessary. (We cut around the top portion of a wonderful rendering by artist Ravinder Sembi).
Adding a 3-D Look to the Face
 Now cut small pieces of the wig and glue them to the face image. This step is not absolutely necessary, but definitely adds a touch of three-dimensional realism if done subtly.
Place the hair randomly across the forehead/hairline, trying to make it appear natural and in disarray. (We pasted tiny bits of hair to the eyes of our face image to make them look sunken and more dimensional, and then added a few wayward curls at the forehead.)
Allow the glue beneath the hair to dry completely, then roll up the face and insert it inside the jar. Spread it out from the inside with your fingers if it remains too tightly rolled. Rearrange the hair with a finger inserted between the face image and the jar if you need to.
Now screw the top on your jar. If you’d like, go ahead and get creative with some dripped-on candle wax (so that it looks as if the jar was hastily sealed) or a length of rattan or rope tied around the jar’s neck.
You’re done – display your creepy cranium among the gristly goods of a Witch’s Kitchen, in some wads of red-dyed “bloody” cotton as a sinister centerpiece or on a shelf where party guests will least expect it. They’ll never believe you were the “brains” behind the experiment – or how easy it was to put it all together!


do u add water
Nope, the “blurry” look of the mask, plus using an old jar will create the illusion of it being filled with water (or formaldehyde!)