The following contribution is from the spooky Screaming Scarecrow Studios. Thanks as always, fellas – stay scary!
When building your Halloween setup, we recommend keeping the traditional, but bring in a bite of the new – “new” if you lived in the 1700s, that is!
A movie that I suspect most of the scare fans here have seen is the The Blair Witch Project. It’s based on a legend that reportedly occurred in the 18th century.
A major factor in the movie that generates fear and suspense is the inclusion of “stick figures,” which hang from trees around the hikers’ tent. They are, presumably, the icons of murdered children, some even dressed in scraps made from the children’s clothing. (Did somebody say “nightmares”?)
To capture the terror the hikers felt when first viewingg the stick figures, try this: as trick-or-treaters approach your front door, make the kiddies walk through a maze of these icons. Hang them from tree limbs or from the tunnel or walk-through.
Ready? Let’s get scary! Here’s the project.
Your Own Blair Witch Project
- To start, you’ll need are a 6-8 inch square cloth (we like to use cut and “distressed” burlap material for the effect, but any cloth with a little “blood” will do; distress the edges by pulling at them).
- You’ll need a material to make lashings (such as dried vines or some twine), or use hot gun glue if you are “knot” challenged (see what we did there?).
- Finally, you’ll need two sticks. One can be forked, but you can also lash two straight sticks together for this effect. “Straight” is a relative term here; a little crooked makes it scarier, we think. Collect branches from your own yard or buy natural sticks.

First, you are going to lash or tack the sticks parallel to each other, the straight stick about one to two inches down from the top of the forked stick. To learn about tying a lashing, visit http://www.inquiry.net/outdoor/skills/b-p/wb/lashings.
Start the lashing with a clove hitch and then cross the “arms” stick perpendicular to the “body” and tie the lashing.


Size the burlap: Set one corner at the fork, and measure the diagonal along the arm.


Once that is done, take the cloth and fold it diagonally from corner to corner. Repeat so the cloth is folded into quarters.
Using scissors, snip the apex of the triangle you’ve formed to make a small hole in the cloth, big enough to slip the “head” of the stick figure through, and unfold the cloth.

Cut a slit toward one of the corners for the front of the “dress”.

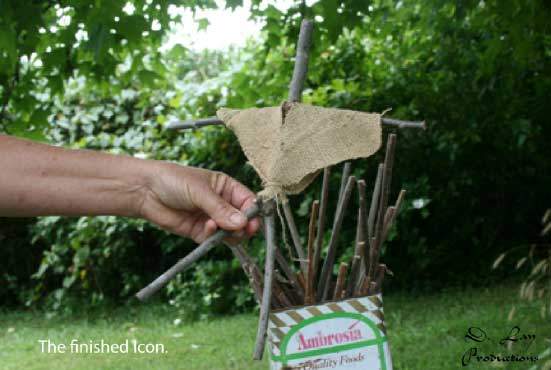
Now you’re ready to slip the cloth over the head of the stick. You’ll want to adjust the cloth so that the apex of the triangular cloth touches the split in the forked stick. Tack this down by tying it with the root material or string, or simply tack it with hot gun glue.


Now all you have to do is make a noose to hang the figure, and find an appropriate tree to hang it from!

You can make all kinds of versions of the stick figure. If you want to make the exact copy of the Blair Witch icon, you’ll need four straight sticks:
Two to make and “X”, one to tie to two tips of the “X”, and one to make the “head”.
Tie the “X” a little above center to give the “legs” a longer length.
Tie the “head” to the cross piece and to the intercept of the “X”. These don’t have any cloth, and you have to do a lot more tying.

Be creative and Happy Haunting!


1 thought on “Scary “Blair Witch” Icons Made from Sticks”