What was that!? Did you hear something? I KNOW I heard somethin’! Get up and check it out!!!!
You know, I still get scared when I wake up in the middle of the night and hear a noise. And I’ve been around a while. Yeah, yeah, I know: It ain’t nothin’ and when I get up to check out the noise, it always turns out to be something harmless. But it’s still scary. And, living out in the country, I still get the creeps when the coyotes start saying good night to each other at 4:30 in the morning.
So, what is it about sounds? I’ll tell ya… it’s because you CAN’T see what’s making the sound; and the first rule to creating scary stuff is that you’ve got to tickle people’s imagination with what they don’t see, or just barely see, or see just in a flash.
Spooky, Background Sounds
My first introduction to the use of sound to create a scare was when I was a young fella who attended a friend’s Halloween party. When guests arrived, his house was decorated as you would expect, dark and creepy. But what made my hair stand on end was the sound. There was a low frequency moaning that sounded horrendous, and it just kept on going. In fact, if my memory serves me correctly, it went for the whole time I was there. How did he do that? Not easy to give up secrets, he finally told me with enough prying. I think I might have stepped on his toe a few times, too.
Here’s how he did it: My friend was fortunate in those days to be able to afford a reel to reel tape deck. The cool thing about a reel to reel was you could record something at fast speed and play it back at slow speed, and that is exactly what he did. He took the tape deck outside when he was cutting wood with his chain saw. He recorded the sound at high speed for the duration of the tape, which was, I think, about an hour and a half, which is also a lot of wood. He then brought the deck in, reconnected it to his stereo, and played the tape back at slow speed which made the tape last about three hours.
And there you have it; the method simple, but the effect immeasurable.
Creating Your Own Spooky, Atmospheric Sounds For Your Halloween Haunt or Party
I’m going to show you essentially the same thing, only using modern digital equipment and software. You’ll need three things to do this:
- A digital recorder… don’t go out and spend thousands of dollars on a professional recorder… I’ll show you why in a minute.
- A computer that will handle media well. Most modern computers will do what I’m going to show you, so unless you’re still using the IBM 365, you’re probably o.k. on that end.
- You’ll need a sound manipulating program, and there are several “out there”. I’m going to recommend Sony’s Sound Forge Audio Studio because it is so powerful in what it allows you to do with the sound you import. I think it is up to version 10 by now, but I have version 9, so that’s what I’ll demonstrate.
1. Collect Your Sounds
First, you want to “collect” sounds. You’ll need a recorder of some kind. I used to just use my video camera and pull the sound off the video tape with my “Capture” program, but I knew that technology had advanced since I was in high school and dinosaurs ruled the earth. I wanted a recorder that I could plug directly into my USB port on my computer.
At first I thought I’d just buy a digital pocket voice recorder, but it turns out when shopping I found an MP3 player that not only played music but it also picked up radio stations AND had a “voice record” feature… AND, it was cheaper than the recorder dedicated just to voice recording. Having a choice between a dozen different MP3 players, I chose the RCA model 1702. When I got it home I tested it and I was impressed by the quality of sound it gave back.

Editor: I couldn’t find the model, but this RCA Mp3 recorder
I’ve attached some sounds that I made with this recorder, and I think for the price, this little item is a winner.
Once you have a way to record that is compatible with your computer, start collecting sounds. Experiment. Try everything. I recorded not only my chain saw, but one of my roosters crowing, background noise while walking across the leaf-strewn yard, me moaning, me reciting “Mary Had a Little Lamb”, etc.
It turns out the chain saw didn’t sound like what I wanted, as I wasn’t able to get the “motor” sound out of the sound. The rooster was good, and so was walking through the leaves. But the best was me moaning, and with me reciting “Mary Had…” running second best. It also turns out that the best “moan” was not an up and down kind of moaning, like you usually hear, but a somewhat consistent moan at about the same pitch range.
I’ve attached .wav files of the unaltered sounds as well as the altered sounds for you to download and play with.
2. Download Your Sounds to Your Computer
Second, download your voice files from the recorder to your computer. I saved my sounds in My Music folder, as I did with the altered sounds from Sound Forge. From the RCA 1702 the files are labeled as “Voice001.wav”, “Voice002.wav.” etc.
I always add a tag of what each sound is. For example, the file “Voice001.wav” became “Voice001 Chain Saw.wav”. When I altered the sound, I then added the effect I used to alter it. So “Voice001 Chain Saw.wav” became “Voice001 Chain Saw Pitch Bent.wav”, and so on.
3. Open Your Sound Editing Program
Third, open “Sound Forge Audio Studio” and “Open” the file you wish to use. I chose “Voice004 Moaning.wav”.
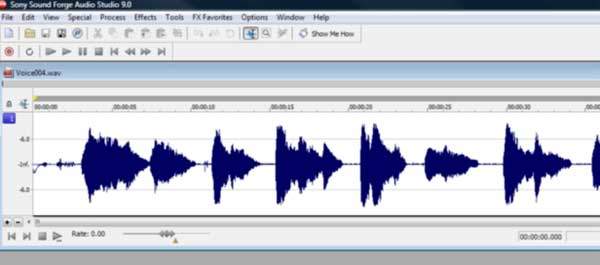
The following is what you’ll see when the file is imported. This is the raw sound, and the blue “splotches” in the window are what is called the “waveform”. The waveform is laid out on a “timeline”. You can see the time elapsed above each part of the waveform.
This is the waveform of me moaning. It sounds hokey, and there is a lot of background noise. I want to get rid of the spaces and make the sound scarier with a lower pitch and some echoing.

First let’s get rid of the spaces between each “moan”. Do this by highlighting the area you want to eliminate, then hit “Delete” on your keyboard. I did this for every space on the waveform timeline. Here’s what it looks like when all the spaces have been removed:

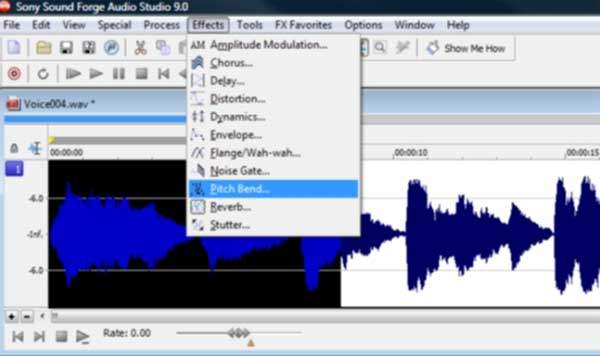
Next, I want to change the pitch of the sound, to make it sound really low. I do this with a feature in Sound Forge called “Pitch Bend”. Go to “Effects” in the top tool bar and choose “Pitch Bend”:

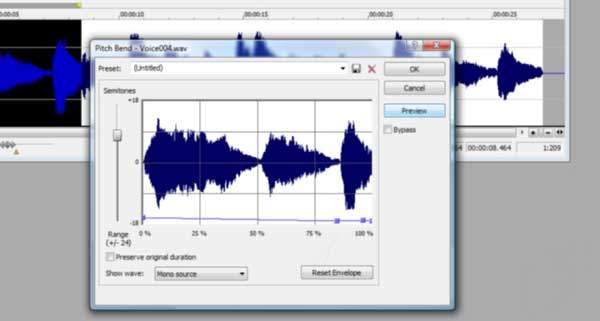
It will give you a window where you can make changes to the pitch and then sample how it sounds before you actually apply it. You’ll see the waveform on the window and some key points with a graphic line to show how the pitch will change with time:

“Grab” each key point and drag it down to a level just above -24 on the graph. Then adjust the “Semitones” to about three fourths the way up above “Range” on the slider to the left. If you’ve highlighted any of the waveform, only that will be changed. If you don’t highlight any of the waveform, then all of the waveform will be changed.
This is what it should look like when you’ve made the changes:

Hit “OK”.
Now, push the “Play” button on the timeline and listen to the effect. Pretty cool, eh? Save this file as “Voice004 Moaning Pitch Bent.wav”. But to give it more depth, it would be nice to have a bit of an echo. Do this by choosing “Effects” in the top tool bar again but this time choose “Reverb”:

Set the sliders “Room size” to ~75 and the “Liveliness” to almost 100%, and choose the Room type as “Rich hall”, and hit “OK”. Now you should have a nice, low-pitched moan that sounds like it is coming from a dungeon or a cave. Listen to the example “Voice004 Moan Pitch Bent Reverb.wav” . Now that is a scary sound, I think.
4. Lengthen the Sound
Next you have to lengthen the time this sound plays. There are two ways to do this: One, highlight the whole waveform on the timeline and “Copy”, then place the cursor at the beginning or the end of the timeline and “Paste”. Keep doing this until you have as much time as you want, limited only by the size of CD or DVD disk you have…
or… burn this file to your CD or DVD and when in your CD or DVD player, have it “Repeat” the “song” over and over.
5. Burn to CD
Last, burn this as a “song” to your CD or DVD burner. There is a feature in Sound Forge that will do this for you: Under “Tools” in the tool bar at the top, choose “Burn track-at-once CD” and follow the menu. OR, save this as a .wav file (Sound Forge will do this automatically) and burn it to a CD or DVD using your own “Burn” program.
The cool thing about Sound Forge is that there are so many effects to play with. The professional version is even more AWESOME than Audio Studio, but a lot more expensive. It is up to version 10, now.
I have yet to download the new version, but from what I’ve read, it’s way above and beyond version 9 in respect to use of files with video, the Web, and also with publishing. I recommend experimenting (playing) with as many effects and processes as you can.
If you mess up, just “Undo…” in the Edit menu in the tool bar. I took my “Mary Had a Little Lamb” sound bite and “Reversed” it (you’ll find “Reverse” under “Process” in the tool bar). The result was me reciting “Mary Had…” backwards, which is a bit creepy. Even better, I then took that and did “Pitch bend” on it followed by a “Reverb” and got a really creepy recitation of “Mary Had…”. Brrr-r-r-r. Chills down my spine! And I’ve only touched the surface…
Happy Haunting!
Halloween .wav files
Download and play with these songs at your leisure! (Right-click and select “Save file as…”)


4 thoughts on “Making Scary Sound Effects: Tutorial”